The complete source code for the project is available on GitHub, only the important part are presented here.
Sensors
The project scale to as many sensors as wanted. They must all be declared in a Python dictionary that contains the min and max limits that will trigger an alarm and the sensor class instance that inherits the base sensors class.
# Define sensors
SENSORS = {
    "AM2320Humidity": {
        "sensor": AM2320Humidity(low_pass_filter_interval=2.3),
        "alarm": {
            "min": 0,
            "max": 60
        },
    },
    "AM2320Temperature": {
        "sensor": AM2320Temperature(low_pass_filter_interval=2.3),
        "alarm": {
            "min": 0,
            "max": 25
        },
    },
    "TMP36": {
        "sensor": TMP36(low_pass_filter_interval=2.3),
        "alarm": {
            "min": 0,
            "max": 30
        },
    }
}main.pyThe base sensor class contains standardized methods to read the sensor value and it’s filtered value. There is one implementation for every sensor.
class Sensor(ABC):
    def __init__(self, name, low_pass_filter_interval=None):
        self.name = name
        self.low_pass_filter_interval = low_pass_filter_interval
        if self.low_pass_filter_interval is not None:
            self.low_pass_filter = LowPassFilter(dt=self.low_pass_filter_interval)

    def get_name(self):
        return self.name

    def get_value(self):
        pass

    def get_filtered_value(self):
        if self.low_pass_filter_interval is not None:
            value = self.get_value()
            if value is None:
                return None
            return self.low_pass_filter.filter(value)
        else:
return self.get_value()sensors.pyEach sensor class contains the specific implementation for the component. They all return 0 if sensors are faked. This allows the program to run without the sensors connected and on a normal computer.
class TMP36(Sensor):
    def __init__(self, low_pass_filter_interval=None):
        super().__init__("TMP36", low_pass_filter_interval)
        if not should_fake_sensor():
            from gpiozero import MCP3002
            self.adc = MCP3002(channel=0, differential=False)

    def get_value(self):
        try:
            return (self.adc.value * 3.3 - 0.5) * 100 if not should_fake_sensor() else 0
        except OSError:
            return None
        except RuntimeError:
return Nonesensors.pyMain loop
The main loop of the program is responsible for reading all sensors values, then it uploads sensors values to MongoDB and ThingSpeak. It also publishes sensors values to MQTT and finally, check for new alarms triggered. If a new alarm is triggered, the LED is light up, the alarm is uploaded to MongoDB and published to MQTT.
while is_running:
    time.sleep(2)

    # Read sensors values
    sensors_values = {}
    for sensor_name, sensor_data in SENSORS.items():
        sensor_value = sensor_data["sensor"].get_filtered_value()
        sensors_values[sensor_name] = sensor_value
        if sensor_value is not None:
            print(f"{sensor_name}: {sensor_value:.2f}")
        time.sleep(0.1)

    # Upload data to MongoDB
    data_id = db.upload_data({**sensors_values, "timestamp": datetime.utcnow()})

    # Upload data to ThingSpeak
    if (datetime.now() - last_thingspeak_upload).total_seconds() > 15:  # Upload data every 15 seconds due to ThingSpeak rate limit
        ts.upload_data(sensors_values)
        last_thingspeak_upload = datetime.now()

    # Publish data to MQTT
    for sensor_name, sensor_value in sensors_values.items():
        if sensor_value is None:
            continue
        mqtt.publish(sensor_name, sensor_value)

    # Check for alarms
    for sensor_name, sensor_data in SENSORS.items():
        if sensors_values[sensor_name] is None:
            continue

        if not (sensor_data["alarm"]["min"] < sensors_values[sensor_name] < sensor_data["alarm"]["max"]) and sensor_data["alarm"]["is_active"] is False:
            print(f"{sensor_name} alarm!")
            is_alarm_set = True
            sensor_data["alarm"]["is_active"] = True
            if not should_fake_sensor():
                GPIO.output(18, GPIO.HIGH)  # Turn on alarm
            db.trigger_alarm(data_id, sensor_name)  # Create alarm in database
mqtt.publish("alarm", sensor_name) # Publish alarm to MQTTmain.pyMongoDB Class
All MongoDB related code is managed by the MongoDB class. After initialization, methods like upload_data, trigger_alarm or ack_alarm can be used to upload to MongoDB. The file can be run as a standalone demo script as it contains a demo code uploading dummy data.
class MongoDB:
    def __init__(self, username: str, password: str, cluster_url: str):
        uri = f"mongodb+srv://{username}:{password}@{cluster_url}/?retryWrites=true&w=majority"
        self.client = MongoClient(uri, server_api=ServerApi('1'))
        self.database = self.client["iot2"]
        self.datalog_collection = self.database["datalog"]
        self.alarm_collection = self.database["alarms"]

    def ping(self):
        try:
            self.client.admin.command('ping')
            print("Ping successful. Connected to MongoDB!")
        except Exception as e:
            print(e)

    def upload_data(self, data: dict) -> str:
        return self.datalog_collection.insert_one(data).inserted_id

    def trigger_alarm(self, data_id: str, type: str) -> None:
        self.alarm_collection.insert_one({
            "data_id": data_id,
            "type": type,
            "triggered_at": datetime.utcnow(),
            "ended_at": None
        })

    def ack_alarm(self) -> None:
        for alarm in self.alarm_collection.find({"ended_at": None}):
            self.alarm_collection.update_one({"_id": alarm["_id"]}, {"$set": {"ended_at": datetime.utcnow()}})

    def get_data(self):
        return self.datalog_collection.find()

    def get_alarms(self):
        return self.alarm_collection.find()

    def close(self):
        self.database.client.close()
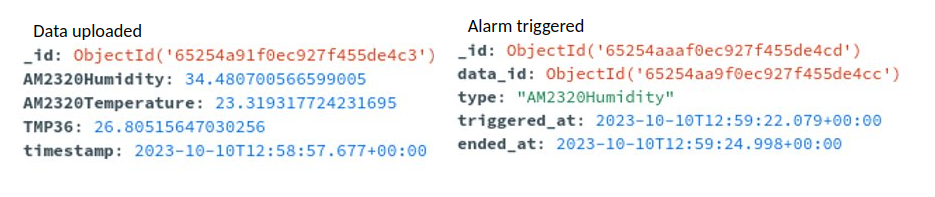
mongodb.pyThe data uploaded to MongoDB have the following structure. All objects have an id automatically added by MongoDB. In addition, the sensors value upload contains one field per sensor and a timestamp field that refers to the instant the data was collected. Due to the NoSQL nature of MongoDB, the addition of a new sensor will work flawlessly as new objects will simply have an additional field. The alarm object contains, the sensors that triggered the alarm, the id of the object containing the values that triggered the alarm and the timestamp at which the alarm was triggered. The ended at field stay null as long as the alarm isn’t been acknowledged. Then the value is updated to the timestamp it was acknowledged.
ThingSpeak Class
All ThingSpeak related code is managed by the ThingSpeak class. It uses the rest API to upload the data, with one field per sensor value. The file can also be run as a standalone example script that upload dummy data.
ThingSpeak website provides a quick and easy way to view data in the form of a graph without installing any tool. The data can also be exported to MatLab really quickly.
class ThingSpeak:
    def __init__(self, api_key):
        self._url = 'https://api.thingspeak.com/update?api_key=' + api_key

    def upload_data(self, data: dict) -> None:
        requests.get(f"{self._url}&field1={data['AM2320Humidity']}&field2={data['AM2320Temperature']}&field3={data['TMP36']}")
thingspeak.pyMQTT Class
All MQTT related code is managed by the MQTT class. It provides connection, publish, and subscribe wrapper. The file can be run as a standalone example script that publish some dummy values.
class MQTT:
    def __init__(self, host, port, username, password):
        self.host = host
        self.port = port
        self.username = username
        self.password = password
        self.client = paho.Client(protocol=paho.MQTTv5)
        self.client.tls_set(tls_version=mqtt.client.ssl.PROTOCOL_TLS)
        self.client.username_pw_set(self.username, self.password)
        self.client.connect(self.host, self.port)

    def publish(self, topic, message= None):
        self.client.publish(f"IOT2/{topic}", message)

    def subscribe(self, topic, callback):
        self.client.subscribe(f"IOT2/{topic}")
        self.client.message_callback_add(f"IOT2/{topic}", callback)
mqtt.pyThe topics used are in the form IOT2/{sensor_name} -> sensor_value for publishing sensors values, IOT2/alarm -> triggering_sensor_name for publishing
alarm and IOT2/alarm_ack -> none for acknowledging all past alarms.
Data Analysis
A python script called data_analysis_mqtt.py can be used to subscribe to MQTT topic and plot the data in real time using matplotlib. All sensors’ values are displayed on the same graph and the graph is uploaded every time a new value is received. Triggered alarms appear as a vertical line in red with the triggering sensor name written next to it. When the alarm is acknowledged, the line becomes green.
import os
from datetime import datetime

import matplotlib.pyplot as plt
from dotenv import load_dotenv

from mqtt import MQTT


def append_data(message, sensor_index: int):
    print("Received message for sensor (" + str(sensor_index) + "): " + message.payload.decode("utf-8"))
    data[sensor_index][0].append(datetime.now())
    data[sensor_index][1].append(float(message.payload.decode("utf-8")))
    update_plot()


def append_alarm(message):
    alarms.append((datetime.now(), False, message.payload.decode("utf-8")))
    update_plot()


def ack_alarm():
    for i in range(len(alarms)):
        alarms[i] = (alarms[i][0], True, alarms[i][2])


def update_plot():
    fig.clear()
    ax = fig.gca()
    ax2 = ax.twinx()
    ax2.plot(data[0][0], data[0][1], 'g', label="AM2320Humidity")
    ax.plot(data[1][0], data[1][1], 'r', label="AM2320Temperature")
    ax.plot(data[2][0], data[2][1], 'b', label="TMP36")
    for alarm in alarms:
        ax.axvline(x=alarm[0], color='g' if alarm[1] == True else 'r')
        if alarm[2]:
            ax.text(alarm[0], 0, alarm[2], rotation=90)
    ax.legend(loc='upper left')
    ax2.legend(loc='upper right')
    ax2.set_ylim(0, 100)
    ax.set_ylim(0, 40)
    fig.canvas.draw()
    fig.canvas.flush_events()


if __name__ == '__main__':
    load_dotenv()

    mqtt = MQTT(os.getenv("MQTT_BROKER_URL"), int(os.getenv("MQTT_BROKER_PORT")), os.getenv("MQTT_USERNAME"), os.getenv("MQTT_PASSWORD"))

    data = [[[], []], [[], []], [[], []]]
    alarms = []
    mqtt.subscribe("AM2320Humidity", lambda client, userdata, message: append_data(message, 0))
    mqtt.subscribe("AM2320Temperature", lambda client, userdata, message: append_data(message, 1))
    mqtt.subscribe("TMP36", lambda client, userdata, message: append_data(message, 2))
    mqtt.subscribe("alarm", lambda client, userdata, message: append_alarm(message))
    mqtt.subscribe("alarm_ack", lambda client, userdata, message: ack_alarm())
    legend = ["AM2320Humidity", "AM2320Temperature", "TMP36"]

    plt.ion()
    fig = plt.figure()

    mqtt.client.loop_forever()
data_analysis_mqtt.py The same script is available for the MongoDB data. It creates a similar graph, this time using the data saved in the database and can be found as data_analysis_mongodb.py
The following video show the MQTT data analysis script in action: